
Personal Creative Development- VFX (Simulation) #1
- Maggie Chan

- May 20, 2020
- 6 min read
Updated: Feb 20, 2021
2nd year (2nd semester)
Assignment: Animation for the Creative Industries
The second assignment for this module (Animation for the Creative Industries) is a second personal creative development project of this year.
Direction:
As I mentioned in my previous personal creative development, visual effects were one of my main interests. VFX was one of the areas that attracted me to this course, I always had this curiosity of this combination between reality and imagination for that reason this was a great small project to invest my time whilst having the access to available sources. There are two areas in VFX which I want to tackle which are simulation and compositing. However, I was told its better to just focus in one area so all my attention isn't elsewhere therefore I decided to go with simulation. Although I'm still open to compositing in future projects.
What I aim to achieve at the end of this project:
My initial plan was to simulate around the four elements; water, fire, earth and air. For instance, for each element, I will simulate a wave (water), explosion (fire), ground crackling (earth), dust (air) etc. However, after the advice talk, it was proposed to be better if I focus on just one element and expand on it. After some thought, I decided to experiment with the fire element /Pyro FX (fire/smoke simulation). What I want to achieve at the end of the project is to be able to light up one of my models in fire. The side goal is to be able to develop realistic simulations that can be used in films.
What is VFX?
'Visual effects (abbreviated VFX) is the process by which imagery is created or manipulated outside the context of a live-action shot in filmmaking'.- Wikipedia
Basically, placing animation effects/imagery/CG into the live-action world. A type of VFX is Simulation where they are working with the particles and fluid effects. Which is later then placed into the final film.
A great read on VFX materials etc:
Practical uses by studios
Nowadays there is countless software to create VFX such as After effects, 3D Maxx, Houdini, Nuke and so on.
I started to research discussions online comparing which software is most suitable for this particular area. After some investigation, Houdini was the best way to go for VFX simulations. Whereas I learn that After Effects and Nuke are more suitable for compositing and so on.
Info. from Uni:
Since I was quite lost to know where to begin I asked for some advice from an animation lecturer, 'Dunleavy' who I learnt has some knowledge about this medium.
Response:
Gerard Dunleavy: Yes Houdini is the right software for simulations or any related technical arts and tool building. VFX simulation is greatly sought out skill also creeping into the game industry.
Some studios to look into if you are interested: N.I- YellowMoon studios, Humain (Grey Maguire) and EnterYes (Kris Kelly), Dublin- Screenscene, Windmill lane
Tutorials are a great place to begin. These are some great places to look into: LearnSquared, FXphd, Gnomon, Gumroad and Entagma Houdini tutorials.
Those studios he mentioned would be great to refer back later down the line. As for the list of the tutorial sites were greatly useful. However a few are only accessible by subscriptions etc. such as Gumroad and FXphd. Nonetheless, it was nice to be able to see the students works on those sites to get a gist of the level they are at and I found Entagma to be especially beneficial site to look for the right materials I needed.
Investigations: Artists
Mregfx (MRE) is a GFX artist who works within VFX creating breathtaking pieces. I've learnt of this artist through Instagram. His work is so fascinating to see how much VFX can do which inspires me a lot to learn this medium.
I found that the Youtuber Blender Guru (Andrew Price) interviews with a lot of various VFX artist on their approach to this position such as:
Youtuber Wren Weichman (VFX artist) which was a great source for influential material as he is quite active in talks. It was nice to listen to his take on VFX. For his workflow, he uses Premiere Pro for editing, After effects for compositing and 3D Maxx for 3D generated stuff.
Some things that I've taken in: Tutorials are the fastest way to learn and build on your skills since it took them years to learn these tips and tricks that could be so beneficial. It's about the process, not the product.
Other interesting artists: Zach king
Process:
Learning the software
Since I am completely new to this software. To get started, this video below was a great introduction to the software.
Five Steps to Learning Houdini Quickly by Indie-Pixel
Reading over the user interface:
Also, a great video called, 'The secret language to Houdini' by SideFx Houdini exploring the VFX language 'Voppity Dop Sop Chop' that covers the whole VFX workflow.
I took some notes to refer back in the future as it does a apply as much for this project since I am only focusing on fire elements simulations VFX but its something useful to consider.

Furthermore, I found a very informative/educational ongoing series called 'Houdini isn't Scary' by Nine between. Which covers many areas of Houdini simplified into each per video. This will be very useful to learn to import my objects and applying the materials later in the project and so on.
Practice test
To get comfortable with the controls I followed an amazing tutorial called, 'Houdini Beginner Tutorial - Simple Disintegration' by MiesnerMedia (Youtube)
Result: I am pleased with the outcome as it helped me quickly get used to the controls and workspace.
Screen record:
Core focus: Fire/ Flame simulation
Reference/Research:
To begin I wanted some reference, therefore I went out and gathered some footage of flames so I can get some better understanding of the shapes, movement and colour in person. I've taken the consideration of my environment because it was quite windy which explains the velocity of the movements of the flame.
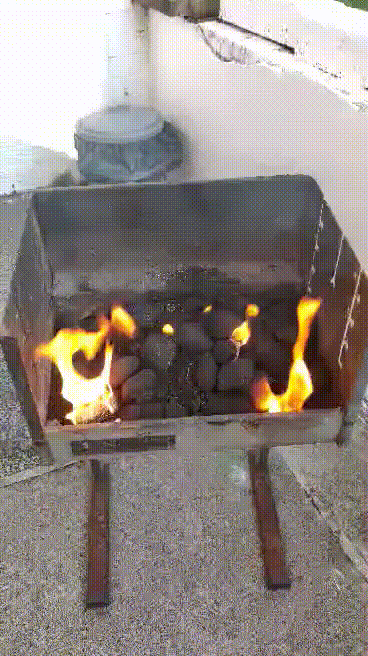
Below is a page of my research on the fundamentals of the element before I go straight into the process of creating the Pyro fx simulation.

Reference images: Trash on fire and other similar fires that burn
Pinterest board: https://pin.it/2Ijj4Ga
Observation:
Colour is mainly bright whitish-yellow in the centre with the orange getting darker the nearer to the edges. The usual white smoke is tinted kind of greyish with hints of black due to it burning material.
Following a tutorial:
A great 'free' tutorial site that relied a lot on was from, 'Entagma' (Houdini Tutorials).
Tutorial by Mark Spevick
For quick references of the video I took some notes down:

Using the tree file provided I started following the tutorial as I applied the method to this plain tree geo.
Before:
Flipbook-

After part 1 of the tutorials:
Part one flipbook:
Render view

Another great tutorial with explanations of the fundamentals:
A screenshot of the foundation of creating a fire from the video, 'Houdini Lesson 4 Pyro FX 1 2 HD'. (Purdue University VFX)

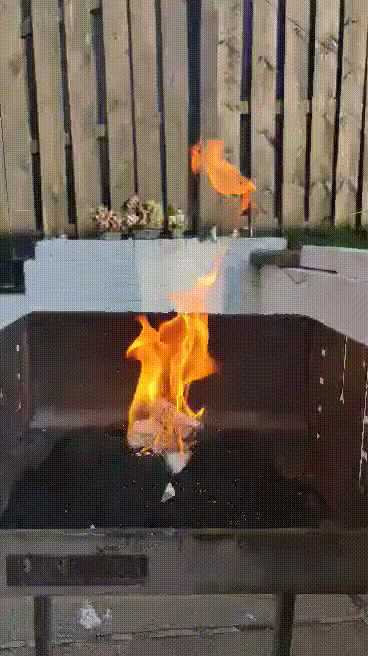
Now having more knowledge on controls I started a new file and began applying the method to my own object instead of continuing it with the provided tree geo file. I will continue following the tutorial whilst adjusting the values to suit my model.
Here I have imported my 'trash' models from Maya and then added the materials through the material palette.

Attempt 1
I started applying Pyro FX flame to the bottles first.

After part 1:
Initially, I want the fire on the bottle to have less consistency compare to the trash bins for that reason I thought I should do it separately. However, after some thought applying as a whole would be more efficient with little differences.

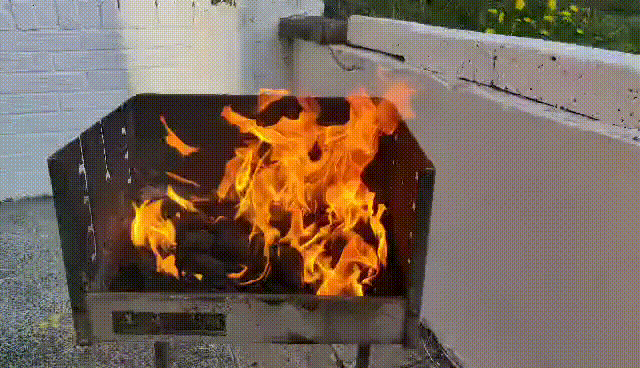
Attempt 2:
Process: render view
Modifying the values to create the flames I wanted:


Flipbook-

Some of the areas that need to be redone.
-Height is too high for what I was going for and it is too sparse.
-The pace needs to be slower.
-The colour is too orange therefore need to eliminate the redness of the overall flames.
Attempt 3
Process:
I lowered the flame heights, fuel scale, timescale and increased the cooling rate, light source exposure etc.
First render clip:


Render:
Pyro FX Render
I notice the smoke wasn't visible. After going over the values I realise the density scale in the shader was too low.
Attempt 4:
Second render clip:
Pyro FX Render with smoke
For some reason, I didn't notice until after the render that the volume box was too confined which made the flames and smoke cutting off. Also spotlight lightning appears too less harsh around the right side of the background.
Final Render:
Final render: Pyro FX flame


Comments